RIP Exercises
Exercise 1: Enable RIP , advertise a network and check routing table.
Steps:
1.Configure IP addresses in the interfaces connecting R1 and R2
2.Create one loopback interface in each router and configure IP address
3.Enable RIP and advertise the network between the routers and the network of loopback
interfaces.4.Check the routing table in both routers
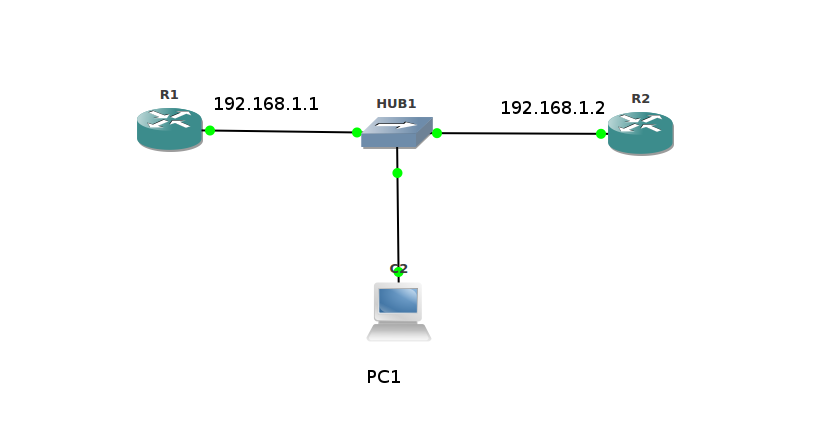
R1 configuration:
Step 1: Configuring IP address in R1
R1#
R1#configure terminal
R1(config)#interface fastEthernet 0/0
R1(config-if)#ip address 192.168.1.1 255.255.255.0
R1(config-if)#no shutdown
R1(config-if)#exit
R1(config)#exit
R1#

Step 2: Creating loopback interface

R1#
R1#configure terminal
R1(config)#interface loopback 1
R1(config-if)#ip address 10.0.0.1 255.0.0.0
R1(config-if)#exit
R1(config)#exit
R1#


R1#show ip interface brief

Interface              IP-Address  	Status  Protocol
FastEthernet0/0        192.168.1.1  	up       up
Loopback1              10.0.0.1 		up       up
R1#


R1#show ip route

C    192.168.1.0/24 is directly connected, FastEthernet0/0
C    10.0.0.0/8 is directly connected, Loopback1


Step 3: Enable RIP and advertise networks

R1#
R1#configure terminal
R1(config)#router rip
R1(config-router)#network 192.168.1.0
R1(config-router)#network 10.0.0.0
R1(config-router)#exit
R1(config)#exit
R1#
R2 configuration:
Configuring IP address in R2
R2#
R2#configure terminal
R2(config)#interface fastEthernet 0/0
R2(config-if)#ip address 192.168.1.2 255.255.255.0
R2(config-if)#no shutdown
R2(config-if)#exit
R2(config)#exit
R2#

Creating loopback interface

R2#
R2#configure terminal
R2(config)#interface loopback 1
R2(config-if)#ip address 20.0.0.1 255.0.0.0
R2(config-if)#exit
R2(config)#exit
R2#


R2#show ip interface brief

Interface             IP-Address 	Status  Protocol
FastEthernet0/0       192.168.1.2   up       up
Loopback1             20.0.0.1		up       up
R2#


R2#show ip route

C    192.168.1.0/24 is directly connected, FastEthernet0/0
C    20.0.0.0/8 is directly connected, Loopback1

Enabling RIP and advertising networks

R2#
R2#configure terminal
R2(config)#router rip
R2(config-router)#network 192.168.1.0
R2(config-router)#network 20.0.0.0
R2(config-router)#exit
R2(config)#exit
R2#
Now check the routing table in R1 and R2
R1#show ip route

C    192.168.1.0/24 is directly connected, FastEthernet0/0
C    10.0.0.0/8 is directly connected, Loopback1
R    20.0.0.0/8 [120/1] via 192.168.1.2, 00:00:18, FastEthernet0/0

R2#show ip route

C    192.168.1.0/24 is directly connected, FastEthernet0/0
C    20.0.0.0/8 is directly connected, Loopback1
R    10.0.0.0/8 [120/1] via 192.168.1.1, 00:00:23, FastEthernet0/0
“show ip route” will show all types of routes (connected, static, rip, ospf etc) , if you are looking only for particular type try the following method
R2#show ip route rip
R    10.0.0.0/8 [120/1] via 192.168.1.1, 00:00:24, FastEthernet0/0

R2#show ip route connected
C    20.0.0.0/8 is directly connected, Loopback1
C    192.168.1.0/24 is directly connected, FastEthernet0/0
Understanding routing table entry:
R2#show ip route rip
R 10.0.0.0/8 [120/1] via 192.168.1.1, 00:00:24, FastEthernet0/0
In the above output,
“R” represents that this route is learned from RIP protocol
In [120/1] , 120 represents RIP’s administrative distance and 1 represent the metric to reach this network 10.0.0.0
The timer 00:00:24, shows that RIP received the last update 24 seconds back
FastEthernet0/0 is the exit interface to reach the network 10.0.0.0
Exercise 2: Verify route poison and poison reverse
When a network gets disconnected , RIP will send an update packet with metric set as 16 for that network, this is known route poison. On reply to this , neighbors will send the same information back to the first router ,which is called poison reverse.
To observe this you need to capture RIP packets using wireshark in PC1
Steps:
Start wireshark capture in PC1
Shutdown the loopback interface in R1
Observe the packets
R1#
R1#configure terminal
R1(config)#interface loopback 1
R1(config-if)#shutdown
Before starting the next exercise, apply “no shutdown” command in loopback1 of R1 to advertise 10.0.0.0 again to R2
Exercise 3: Verify expiration timer and garbage collection timer
Expiration timer:
When RIP stops receiving updates packets from a neighbor , it will wait for 180 secs and will mark the networks as unreachable (Metric will be changed to 16).
Garbage collection timer:
After expiration time, RIP will keep the networks for 60 more seconds in its database with metric value 16. During this period it will send updates to all neighbors in periodic intervals with metric set as 16 . Finally after 240 secs (180 + 60) RIP will remove that route from its routing table.
Steps:
1.Configure RIP and advertise networks as in the first exercise.
2.Verify that R2 is showing “10.0.0.0” in routing table
3.Disable RIP in R1
4.Repeat the command “show ip route rip” in R2 & observe timer and metric
Disabling RIP :
R1#
R1#configure terminal
R1(config)#no router rip
Related:
Cisco OSPF configuration examples
- Quick Links Protocol testing Protocol testing training
- Python Tutorials Variables and Data types Loops Strings List and Tuples Dictionary Functions Classes and Objects File operations Exception Handling
- Cisco commands Basic commands RIP configuration OSPF configuration BGP configuration Example
- Linux commands linux networking commands: IP
- Interview Questions Protocol testing interview questions